Draw a site boundary and check its area
Site work starts by fixing the boundary. In topoGenesis you pull in a parcel by address or click points to close a boundary, then read its area and dimensions straight away.
Real example: Gwangan-dong, Suyeong-gu, Busan
- Site area
- 112㎡
- Floors
- 3 above grade
- One-line brief
- “A three-storey detached house for a couple with two children”
- Spaces it made
- Entry 3.6 py · living 14.5 py · kitchen 3.9 py · dining 8.2 py · main bedroom 23.3 py · two children’s rooms 15.1 and 14.5 py · family room 7.6 py · parking 9.1 py · plant room 13.3 py
- Three generated options
- Option 1 L/T corner · GFA 393 m² · score 75
- Option 2 inner lobby · GFA 393 m² · score 71
- Option 3 egress first · GFA 401 m² · score 74
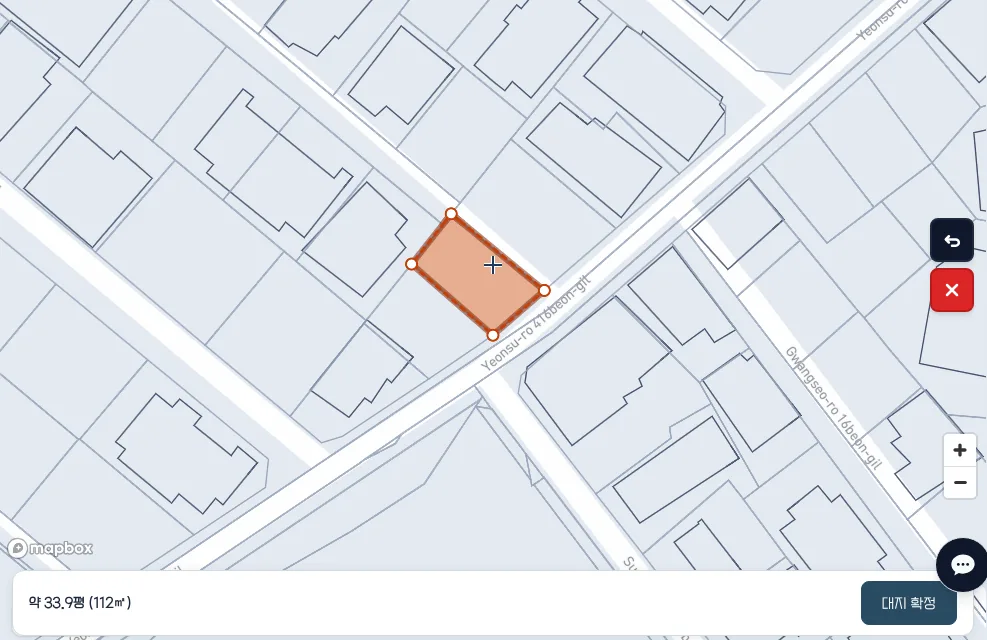
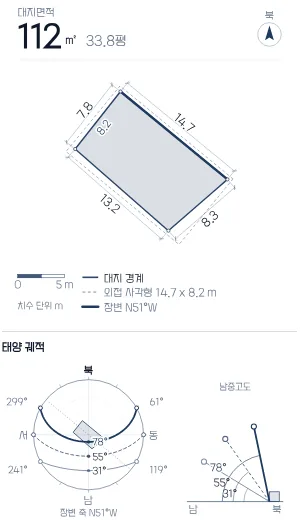
Searching the address picked up the parcel boundary at once, with “about 33.9 py (112 m²)” at the bottom. After confirming, the panel listed edge lengths of 7.8, 14.7, 8.3 and 13.2 m, a 14.7 × 8.2 m bounding box, a N51°W long side, and a 1.8 : 1 aspect ratio.
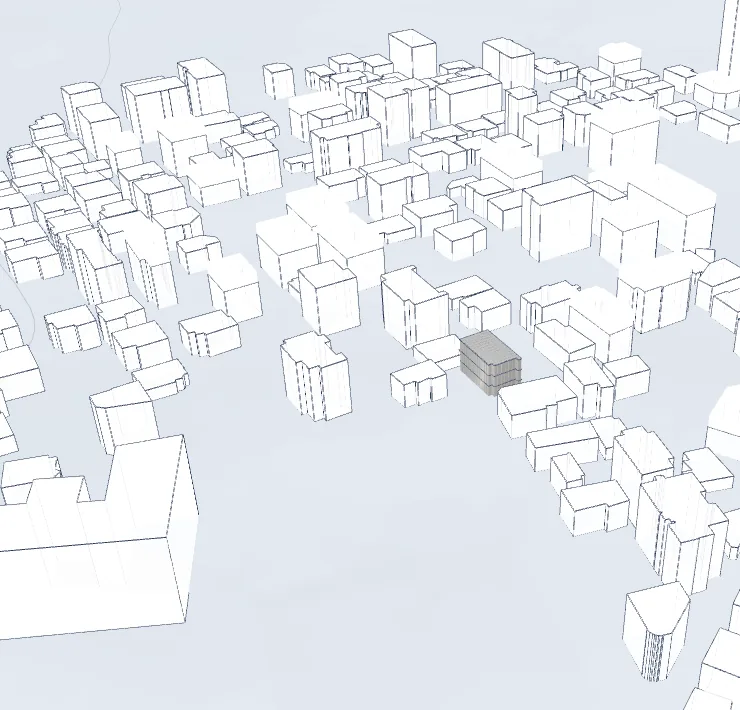
The same screen showed 78 buildings within 100 m (10 m average, 27 m tallest) and noon sun altitudes of 31°, 55° and 78° for the winter solstice, equinox and summer solstice. A three-storey (9 m) mass then went on the boundary among its neighbours.
Generated for this site in the topogenesis.xyz studio on 2026-10-24. Numbers and images are as the screen showed them.
Pull it in by address or click points
Type an address or lot number in the search box and that parcel’s boundary is picked up, with “about N py (N m²)” shown at the bottom. To use your own extent instead of the parcel, click points on the map; three or more close a boundary.
Click the middle of an edge to add a vertex there, and use undo and clear to fix points.
Confirming lists dimensions and bearing
Press confirm site and the left panel shows site area (m² and py), each edge length, the bounding-box size, and the long-side bearing (for example N57°E).
The same screen shows the sun path and noon altitude at the solstices and equinox, the count, average and tallest height of buildings within 100 m, and shape simplicity and aspect ratio.
On a Korean site, cadastral lines are a reference
On Korean coordinates you can turn on parcel lines and use labels. Keep the parcel lines beside you while you choose the boundary.
The area is read from the polygon on screen. It does not replace a survey drawing or a registered area.
After the boundary, continue to mass
After the area, go to the mass step and set above-grade and below-grade floors. With neighbours and terrain on, see the volume on that spot in 3D.
Questions
- How many points before an area appears?
- Three or more close the boundary and give an area. Pull in a parcel by address and it appears without clicking any points.
- Can I use that area as the official area?
- No. It is an early check read from the boundary on screen. It does not replace a survey.
- Why does the area right after the search differ slightly from the confirmed area?
- In the Gwangan example the bar after the search read “about 33.9 py (112 m²)” and the left panel after confirming read “112 m², 33.8 py”. The square metres match; the two places round the pyeong figure differently, hence 0.1 py. Either way it is read from the boundary on screen, and the mass and plans built on it are not final drawings.
Try it on topogenesis.xyz
As in the Gwangan example, one address line pulls in the parcel and lays out edge lengths from 7.8 to 14.7 m and the N51°W long side on one screen. Fix the boundary first, then raise the floors to see the volume on that spot.
Start the studio on topogenesis.xyz